python tutorial
Python Tools
Learn more about Python, one of the world’s most versatile and popular programming languages.
There are a number of tools and software used to code with Python, including integrated development environments, JupyterLab interfaces, and more.
Let’s take a closer look at common Python tools.
Integrated Development Environments (IDEs)
Writing code requires some unique tools – in the same way, we use tools like Microsoft Office or Google Docs to write a word document, we require a special program to help us write code. Regardless of the language we choose, this typically involves installing the language itself and setting up our development tools to make writing code easier and customized to our purpose or workflow.
Luckily, programming tools like IDEs or Integrated Development Environments have evolved and matured to a level where we can easily get started with the language of our choice without spending hours going through the setup and installation.
IDEs are software applications that, once installed, provide programmers with a wide range of pre-configured tools and facilities to make programming easier and fun. Instead of memorizing complex commands and code to perform repetitive tasks, IDEs are Graphical User Interfaces (GUIs) that allow programmers to perform their intended tasks with the click of a button. These programs often ship with a customizable interface that includes:
- A source code editor
- Language implementations
- Auto-complete features
- Options to store and retrieve code from source control tools like Github
- And a wide range of controls to navigate and inspect your code.
Below are some of the most popular IDEs for programming in Python. While some of them require a paid license for team usage and access to advanced features, most of them do come with a free version that should be sufficient for any programmer. There are also a wide range of IDEs that are always free and open-source, and provide all the core features that a paid IDE might provide. You can also find many online, web-based IDEs for writing code quickly without having to do any setup. For this course, we will be using a web-based IDE called Jupyter, and setting it up would be as easy as browsing through a website.
Should you choose to pursue more Python work in the future, here are a list of popular IDEs.
Popular Standalone Python IDEs:
- PyCharm – A dedicated Python IDE
- Sublime Text – A text editor with multi-language support however, it requires configuration for specific languages
- Visual Studio Code – The most popular IDE among programmers. Requires installation of extensions for advanced features
- Atom – A text editor with multi-language support that is similar to Sublime Text
- IDLE – Ships by default with Python, but is not the most user-friendly for beginners
- Spyder – A great choice if coding exclusively in Python
- Thonny – A beginner-friendly Python IDE
Popular Web-Based Python IDEs:
- Jupyter Notebooks – A fantastic interactive programming software with support for many programming languages. We will set up and use a variation of this IDE called JupyterLab.
- Programiz
- Replit
- Online-Python
- PyNative
JupyterLab Setup
Jupyter notebooks are a fantastic way to learn a new programming language. It provides an interactive way to code and see the output as you progress. It also allows you to customize the environment to your needs and make the programming workflow much easier. It is an open-source software that is endorsed and supported by world-renowned tech companies, and is heavily used by Data Scientists around the world.
Jupyter allows one to use the software by installing it on their machine or by trying it first in the browser without having to do any installation. Let’s look at the step-by-step instructions on how to try JupyterLab in the browser.
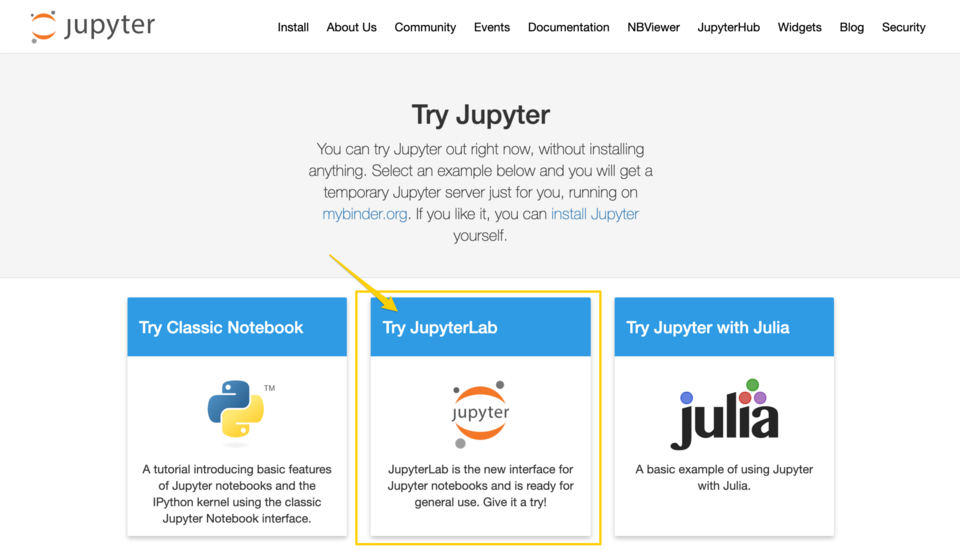
- Navigate to the Project Jupyter website using this link.
- Click on the
Try JupyterLabcard as seen in the image below.
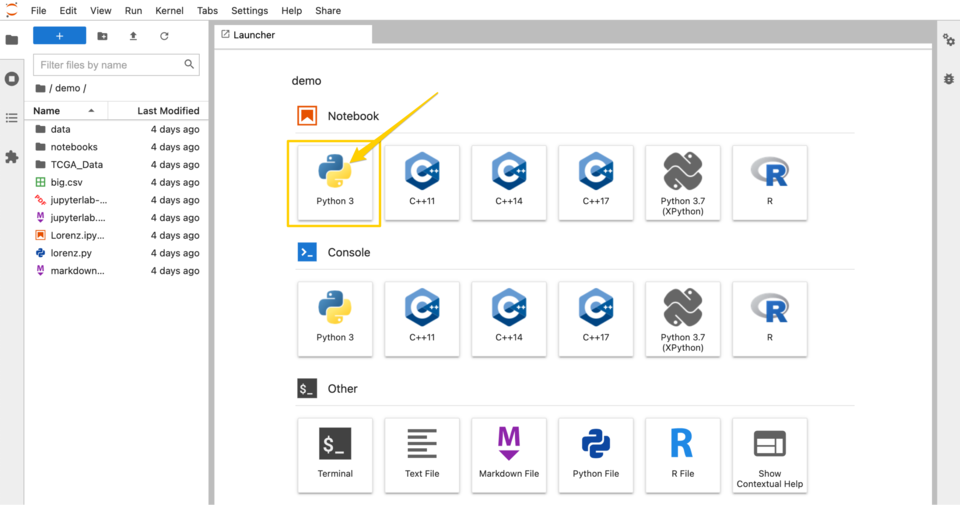
- Allow Jupyter a minute to set up the environment for you. Once it’s done, you should see a Jupyter environment that looks similar to what’s below.
- Click on
Python 3under theNotebookheading near the top of the window.
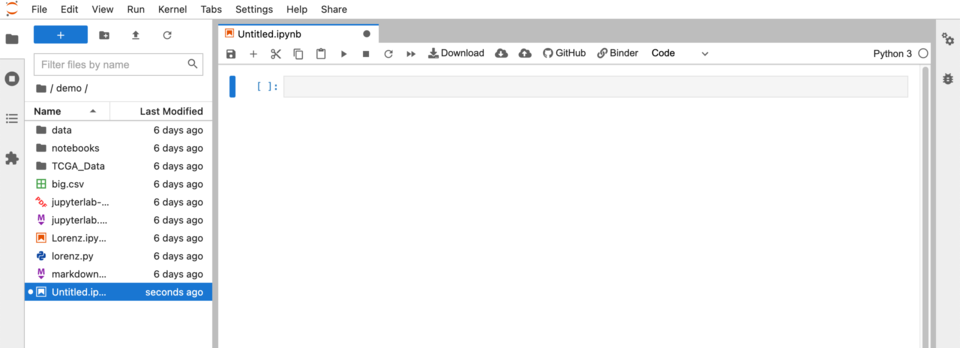
You should now see the Jupyter notebook environment, similar to the screenshot below. Jupyter notebooks provide an interactive environment where you can type your code in cells and run them. A cell can have valid Python code or just textual information (also called markdown) for users of your notebook to read through.
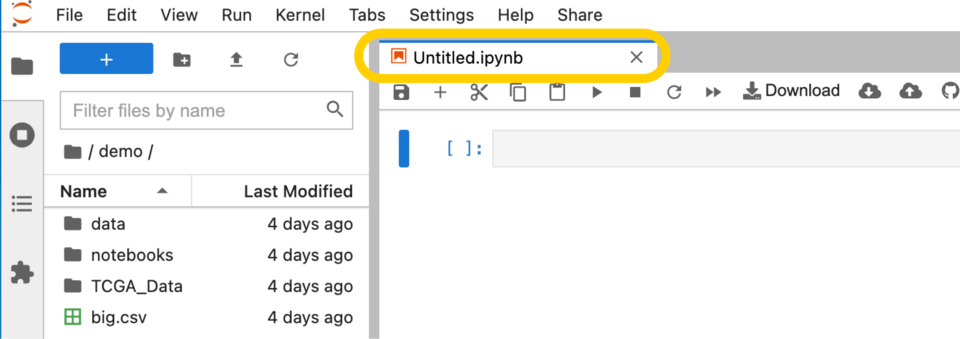
JupyterLab Interface
Before going any further, let’s first take a look at the user interface to familiarize ourselves with the core functions and features.
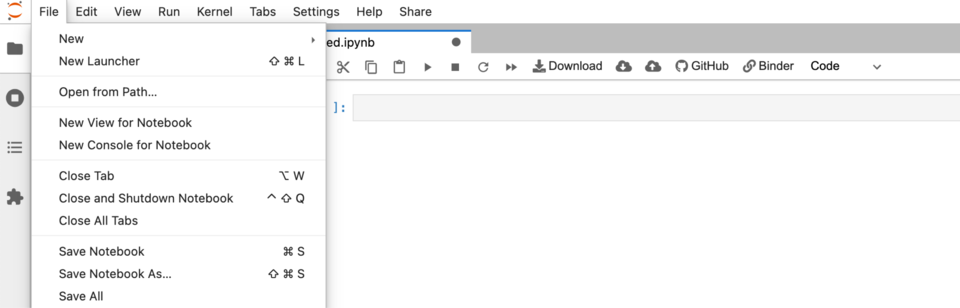
File menu
Like many other programs, the file menu contains key functions for saving and running notebooks.
File explorer
All files in our workspace are contained here. This explorer gets reset after you exit the tab. We’re only concerned with our notebook, which you’ll get more instructions on later.
Notebook tab
This is the main area of the interface where we’ll be writing our code.
Cells and active cells
Code is written in cells, and active ones have a blue bar displayed next to them. Inactive cells have no bars, and only the cell you are working on will be active.
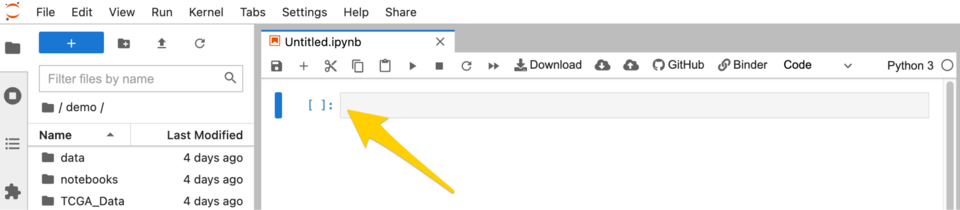
Toolbar
The toolbar contains quick access to key features such as saving a notebook, adding a new cell, etc.
Creating a Cell: We can hit the + button in the toolbar to create a new cell.

Running a Cell: To run a cell, we can hit the “Play” button on the given active cell.

Downloading a Notebook: Clicking the “Download” button on the toolbar will automatically download a copy of the notebook to your computer. Make sure your work is saved first.

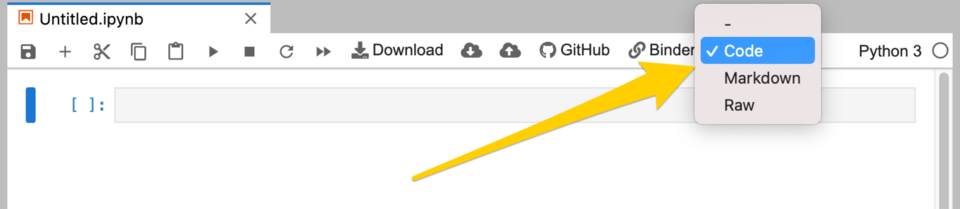
Cell Type: The “Cell Type” dropdown is extremely important as it will allow you to choose between writing code or text. For the most part, we will be using code cells in this course. Markdown is the term for text here, and generally uses plain text with a few formatting additions.
Kernel: While we won’t need to actively use this option, it’s a good idea to make sure that this is set to “Python 3” before proceeding with your work. Clicking on the kernel option will allow you to choose the value for it.

Using JupyterLab
Now that we have access to the tool, let’s learn how to use it properly for coding with Python. Before we get started, please note this virtual coding environment clears your work when you leave it. We’ll teach you how to save and download your work so that you can view it in the future.
Running a Code Cell
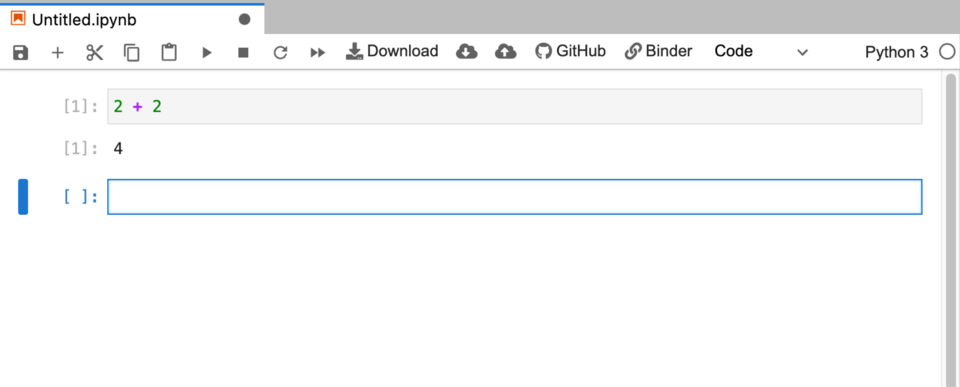
- Let’s add our first line of Python code and see how to use Jupyter notebooks to run the code in a cell. Type
2 + 2in the cell and pressShift + Enterto run the cell. Alternatively, you can also press the “Run” button in your notebook. - Sometimes if you find that your cells cannot be executed, please make sure Python 3 is selected as your default kernel in the top right corner of your notebook. If it says “No Kernel”, click on it and switch it back to Python 3.
Running a markdown cell
- First, create or select a cell. We will need to convert this cell (which is by default a code cell) into a markdown cell. The current cell or active cell is marked by a small blue banner on its left. We can use the “Cell Type” dropdown in the toolbar as mentioned earlier. Switching the option on the active cell to “Markdown” will turn the cell into a markdown format which can be used to type non-code information such as description, images, explanation, etc. While it’s not necessary for the scope of this course, feel free to check out this cheat sheet on how to write information using markdown.
- You can also do this by pressing
Mwhen in command mode. Command mode can be activated by pressingEsc. - Please type the information shown below in your markdown cell. You’ll see what it should look like at this point in the screenshot below.
# This is a level one heading
## This is a level two heading
### This is a level three heading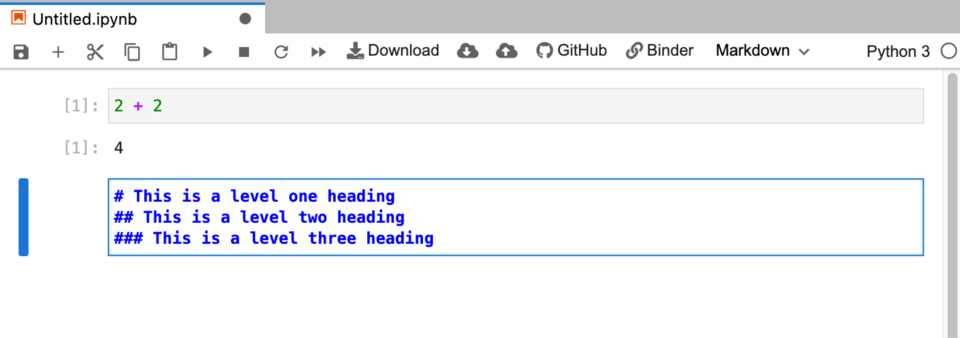
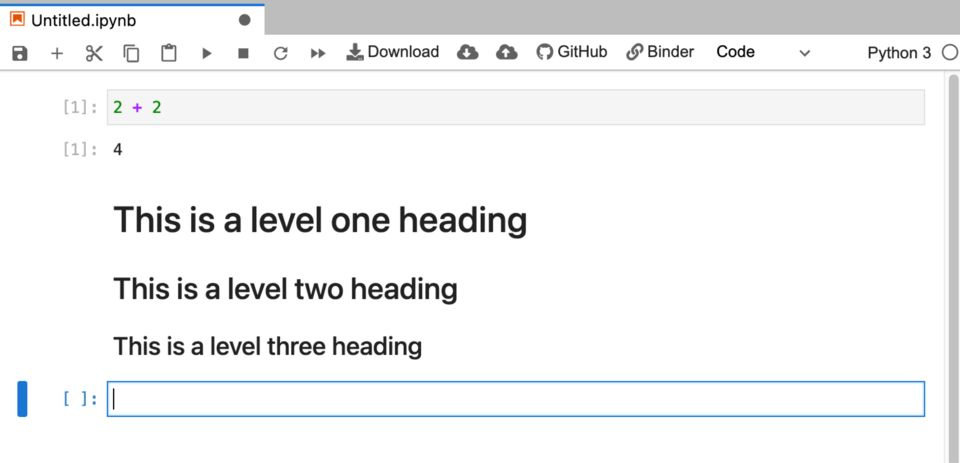
Now, run the cell using Shift + Enter or by clicking the “Run” button. It should now appear similar to the next screenshot below.
Saving work in your notebook
At any point, you can save all the work done in the notebook by pressing Ctrl+S on Windows or ⌘+S on Mac. You can also save your file with a name by pressing Ctrl+Shift+S on Windows or ⇧+⌘+S on Mac. When a dialog box appears, choose an appropriate filename that ends with .ipynb. As seen in the image below, there is the text demo/ before the filename. We can ignore that since it’s only referencing where the file will be saved on this demo environment.
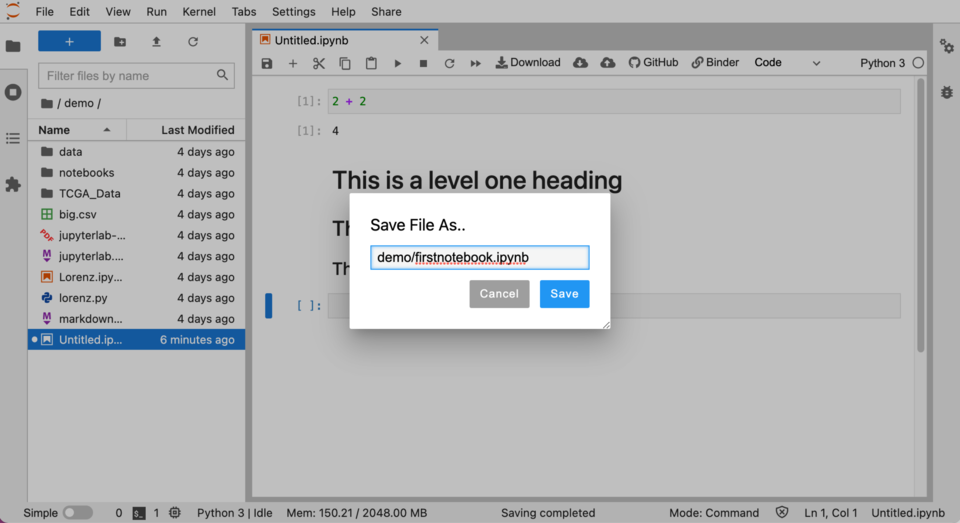
- Alternatively, these options can also be found under
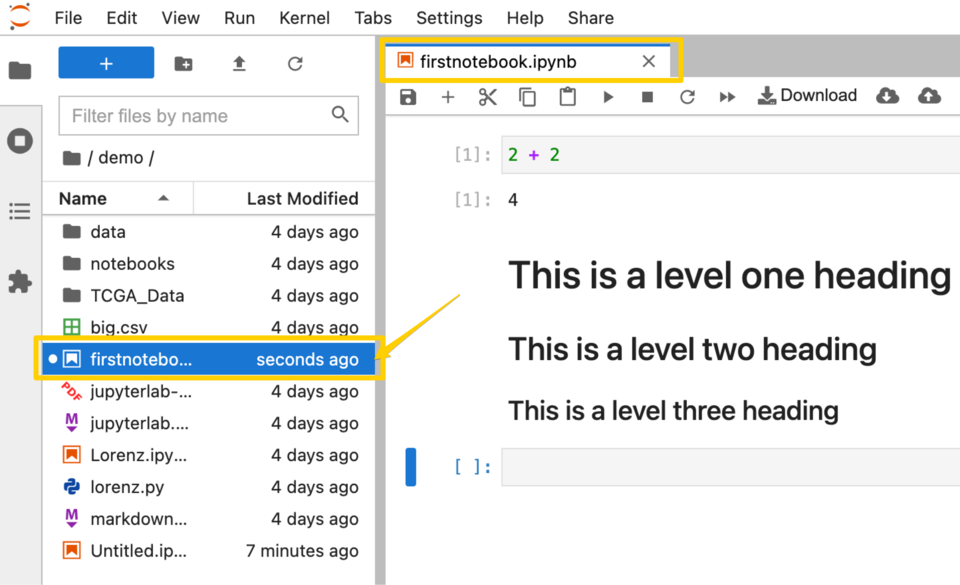
File -> Save NotebookorFile -> Save Notebook As... - Once done, your new notebook should appear under the file explorer on the left.
Downloading your notebook
- You can even download your notebook for future use or for sharing by clicking the “Download” button on top of your notebook or by navigating to
File -> Download - There is also an option to export your notebook in various formats by navigating to
File -> Export Notebook As…
Opening a downloaded notebook
- If you had your notebook downloaded in the previous step, you can easily open it again at a later point by starting your JupyterLab again and then clicking on the “Upload Files” button in the top-left corner.
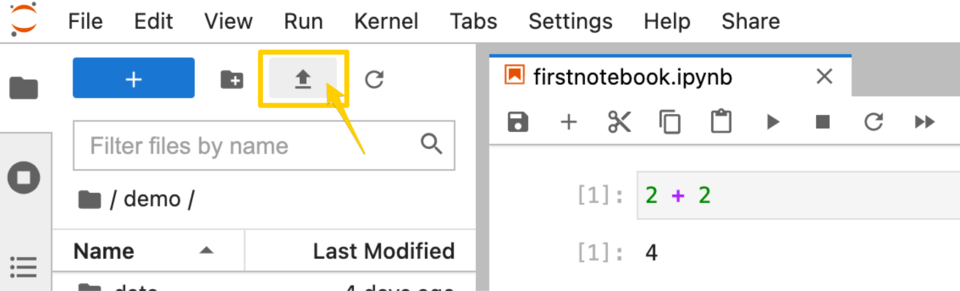
Navigate to the folder where you downloaded your notebook and upload it. Once uploaded, the file should be available in file explorer. Double-click on it within the file explorer to open the file and start using the notebook.
Learn Python Today
Get hands-on experience writing code with interactive tutorials in our free online learning platform.
- Free and fun
- Designed for beginners
- No downloads or setup required